Warrior/Monk build that can be used to farm the green item Rajazan's Fervor, but is also very effective for farming melee enemies or bosses, such as Reefclaw Ragebound.
Attributes and Skills[ | ]
| Attribute Rank | |
|---|---|
| Healing Prayers | 8 |
| Strength | 9 + 1 |
| Swordsmanship | 8 + 1 |
| Tactics | 11 + 3 |
 |
 |
 |
 |
 |
 |
 |
 |
Equipment[ | ]
- Armor
- Weapons
- Malinon's Shield or any shield with equivalent stats.
- The green Exalted Aegis (Either version) or any shield with equivalent stats.
- Sword of Fortitude
- Longbow
- Any Focus Item that gives additional energy
Usage[ | ]
Preparations[ | ]
- Put Malinon's Shield and the sword as weapon set #1.
- Put Exalted Aegis and the sword as weapon set #2.
- Put the Focus Item and the sword as weapon set #3.
The Run[ | ]


Map with marked important areas in Unwaking Waters
Rajazan is at [3], the other end of Unwaking Waters (explorable), near the Kurzick exit. Therefore, you must run to him.
Start at the outpost Harvest Temple. Equip the Weapon set #1 and cast Mending on yourself.
Start running, following the map. The Shiro'ken Rangers will try stopping you by draining your energy with Debilitating Shot. Once the Shiro'ken patrols get into your aggro circle, use Sprint and run. Don't get surrounded or trapped.
Your Sprint will last 12 seconds. When Sprint starts blinking quickly cover it up with Enraging Charge, which will last 11 seconds. Once you reach [1], Resurrection Shrine, you will be safe. Recover until full hit points and energy.
Creeping Carps await you. Lure them back to the Luxon/Kurzick guards and kill them, the Priest will heal you regardless of your allegiance. If you don't kill the carps, they will cast Siphon Speed on you and hunt you down. Furthermore, there will be patrols of Kraken Spawns and Outcasts – avoid these, especially the Krakens.
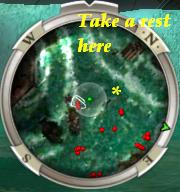

Take a rest here at the yellow *
Your road lies to the left, and when you head into this road, three Outcast Assassins will pop out – get past them. If the Krakens have cast hexes on you, quickly turn to the right path run to the safe area [2] with boosted speed. Cast Healing Breeze to counter the degens and spam Healing Signet. Once the hexes have worn off, re-cast Mending (if removed) and head towards the Shiro'kens.
Use Sprint when the first group of Shiro'kens gets into your aggro-circle. Then use Enraging Charge.
Saltspray Dragons kill you, so hug the wall and stay away from them at all cost. If you are damaged, use your Healing Signet. When you are nearing [3] you will see Rajazan's outcast group, a group of Kraken Spawns and a group of Creeping Carps.
You can either carefully sneak through or just use Sprint to get past them to [4], the safe area. If your enemies are still chasing you, run around until they lose aggro - or equip weapon set #2 and kill them. When you are ready to deal with Rajazan, turn off all enchantments.
Defeating the Outcasts[ | ]
Rajazan and his outcasts will be fighting another group of outcasts. His group:
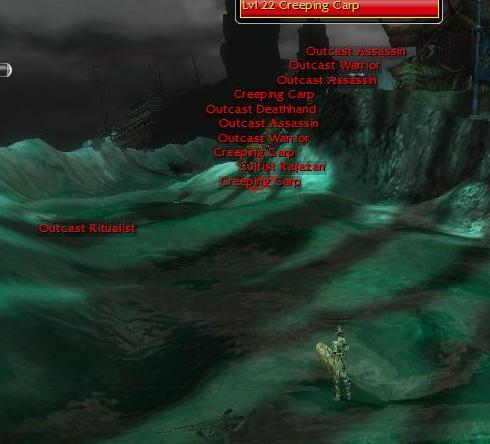

Rajazan and a group of outcasts locked in a fight.
If the Creeping Carps were lured in here, they will also start fighting with the group of Outcast that are standing on the cliffs. The melee-fighters will stand still doing nothing while casters will try killing the Outcast on the cliffs with spells.
Now you have two choices:
- Wait and pull Cultist Rajazan.
- Go and attack.
Wait and pull Rajazan[ | ]
Get your bow out. Wait until Cultist Rajazan has defeated the other outcasts. The Creeping Carps will retreat and Cultist Rajazan will start wandering around again. Shoot him. Pull him out of his group and kill him alone. If the rest of his group is aggroed, Sprint back to [4] and shake them off. Repeat until you succeed in separating Cultist Rajazan from his group. This may take a few (or more) tries. Once you have Cultist Rajazan lured back, kill him and pick up the loot. Repeat the run until you get the Rajazan's Fervor.
Go and attack[ | ]
You can run forth when Cultist Rajazan is busy and start attacking him. After a few swings with your sword he will change his target and attack you. If this happens, pull him back from the rest of the group and kill him. It is very often that you aggro the whole group of outcasts, and if you do, retreat to [4] and retry.
If you want to kill off Rajazan's party members, do it in this order:
- The lured Creeping Carps (easy to separate from Outcast-group)
- Outcast Assassin. Enchantment removes, can interrupt skills and cause cripple.
- Outcast Warrior. Can cause cripple, is equipped with Disrupting Chop.
- Outcast Deathhand. Plague Touch and enchantment remove.
- Cultist Rajazan. Plague Touch and enchantment remove.
Pick up the loot. Repeat the run until you get the Rajazan's Fervor.
How to win[ | ]
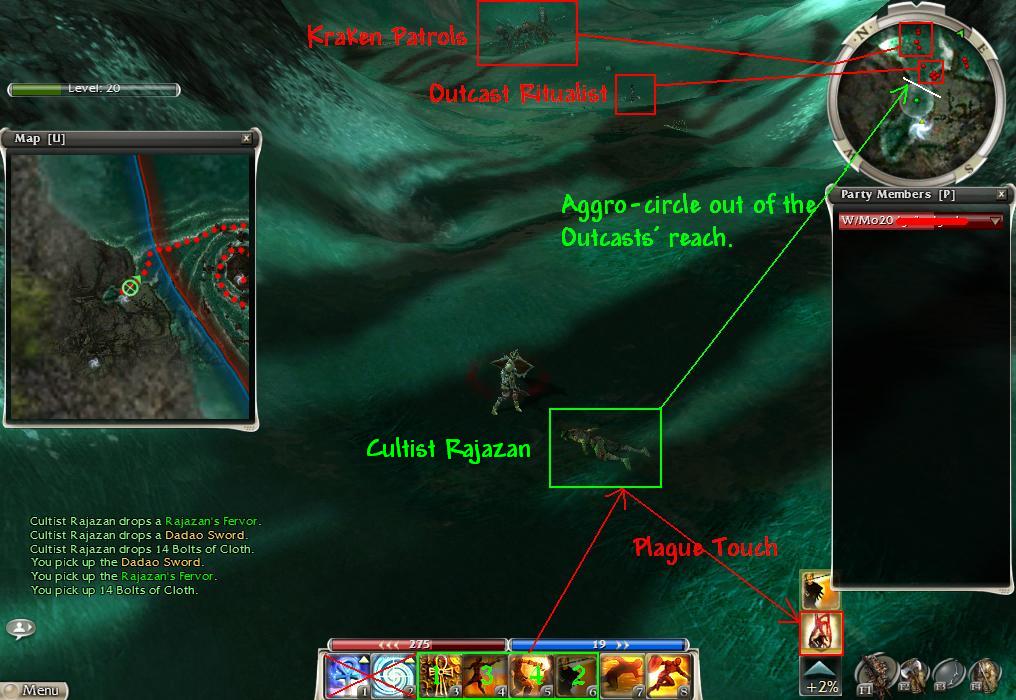

How to win, explanatory picture.
The build is centred on Auspicious Parry, Riposte and Deadly Riposte. You kill them by spamming these skills in the order:
1. Deadly Riposte 2. Auspicious Parry 3. Riposte
The following enemies will remove your enchantments:
Survival[ | ]
Some enemies are equipped with interrupting skills - Outcast Assassin and Outcast Warrior. They will try disabling your Healing Signet.
Therefore when you use your signet, make sure you have the ripostes and parries ready. Ripostes and parries can be used even while casting Healing Signet. Recommended order of healing/spamming skills:
1. Healing Signet + Deadly Riposte 2. Auspicious Parry 3. Riposte
Make sure they had triggered the first parry/riposte before using the next.
Variants[ | ]
Healing Breeze can be dumped once you've learned how to avoid Krakens. In that case, replace Mending with Watchful Spirit and spend the rest of the attribute points on something else. Healing Breeze can be replaced with a useful sword skill or a condition-removal for survival.
 |
 Optional |
|
|
|
|
 |
|
Notes[ | ]


Out of Energy? Not enough Adrenaline? Whack the spirit!
- You can have up to 30% Death Penalty and still have enough HP/energy to do the rest of the run.
- If your Auspicious Parry doesn't charge up fast enough, switch to weapon set #3 for energy and Sprint from the Shiro'ken. If Sprint is recharging, run forth to whack the Famine spirit once to charge up Auspicious Parry.
- You can switch off your armor-part with the superior rune with something that has a minor during the run, giving you more HP, and then equip it when you start fighting your foes.
- NPCs at the resurrection shrine will only help you fight if you are in their Faction, but the priest will aways heal you.
- Sometimes Cultist Rajazan's group won't ever kill the other Outcast group so you will have to step forth and lure Cultist Rajazan by hitting him with a melee weapon or clear everything.
- Sometimes when you shoot Cultist Rajazan, he might run out into the middle of the map - probably trying to find a way up to the cliff-Outcasts.
- The Outcast Ritualist won't go melee and takes a long time to kill. She will also kite you - just ignore her.