A 6 Man Team Build for the Elite Mission The Deep
Overview[ | ]
This team consists of:
- 2
 /
/ Tanks
Tanks - 1
 /
/ Spirit Ritualist
 - 1 / Spiteful Spirit Necromancer
- 2 / Healer Monks
Membership[ | ]
W/A Tank[ | ]
| Attribute Rank | |
|---|---|
| Strength | 10+2+1 |
| Swordsmanship | 10+1 |
| Tactics | 11+2 |
 |
 |
 |
 |
 |
 |
 |
 |
Variations:
- Attribute points can be varied to preference.
- Nightfall Variation: Substitute Power Attack with Counterattack.
- Both attack skills can be exchanged for other attack skills.
Equipment:
- Must have a weapon that does cold damage to activate Spinal Shivers.
- Must have a longbow. Flatbows have the same range, but are less effective in certain areas due to low accuracy against moving targets.
Rt/X Spirit Ritualist[ | ]
| Attribute Rank | |
|---|---|
| Communing | 11+2+1 |
| Channeling Magic | 10+1 |
| Spawning Power | 10+2 |
 |
 |
 |
 |
 |
 |
 |
 |
Variations:
- Attribute points can be varied to preference.
- Nightfall Variation: Disenchantment could be replaced with Anguish if the team is not concerned about rare Nightmare Refuges that slip through without being interrupted. Anguish does more damage, has a longer duration, and has a shorter casting time.
Equipment:
- HSR and HCT is not of great use for this build, as the Binding Rituals are not considered spells.
N/Me SS Necromancer[ | ]
| Attribute Rank | |
|---|---|
| Curses | 12+3+1 |
| Blood Magic | 10+1 |
| Soul Reaping | 8+1 |
 |
 |
 |
 |
 |
 |
 |
 |
Variations:
- Soul Reaping can be increased at the expense of Blood Magic, as per preference, to yield more energy from the Spirit Battery in Kanaxai's Chamber.
- Nightfall Variation: Substitute Defile Enchantments with Signet of Sorrow. If you go this route, you should adjust your attributes to increase Soul Reaping and decrease Blood Magic.
Equipment:
- A Wand and Focus Item with dual 20% HSR and 20% HCT works well. Alternatively, a 20/20 Wand and Villnar's Glove.
- It is useful to have a second weapon set consisting of a Wand and Focus with +15 energy / -1 Energy Regeneration attributes. During a battle, you can switch to this second weapon set to allow yourself to continue casting. Soul Reaping will then recharge your energy as creatures die.
- It is useful to have one piece of Bloodstained armor
Mo/X Heal Party Monk[ | ]
| Attribute Rank | |
|---|---|
| Healing Prayers | 12+3+1 |
| Divine Favor | 12+1 |
 |
 |
 |
 |
 |
 |
 Optional |
 |
Variations: The monk skill bar is very flexible. The only mandatory skills are Heal Party, Healing Seed, and Rebirth.
- Possibilities for the optional slot include another healing skill (such as Healing Whisper or Healing Breeze), Protective Spirit, a condition remover, a hex remover, or Recall. You may need to adjust your attributes to accommodate your optional skill.
- Nightfall Variation: Replace Word of Healing with Light of Deliverance. If you do this, you may consider exchanging Heal Party for a different skill.
Equipment:
- Equipment can be varied as per preference.
- Common Weapons: a 20/20 Wand or Caster Melee weapon with +5 energy and +20% Enchantment Duration modifications.
- Common Focus Items: 20/20 Healing Focus or The Stonehart.
- Nightfall Equipment: The release of Nightfall introduced the possibility of using Spears instead of Melee weapons by casters. An Icy Spear of Enchanting with +5 energy or 10% HSR inscriptions can be useful in rare instances to trigger Spinal Shivers.
General Concepts[ | ]
- This team build emphasizes coordination and purpose over specific builds. Many variations can be used as long as you can fulfill your specific purposes.
- Warrior: Aggro management/Pulling, Damage mitigation, Knockdown, Secondary damage dealing, Interruption
- Ritualist: Damage, Conditions, Knockdown, Resurrection
- Necromancer: Primary damage dealer, Damage mitigation, Interruption, Corpse Disposal, Battery
- Monk: Healing, Resurrection
- Energy Management: There is no Blood is Power Necromancer in this team. Although the necromancer does carry Blood Ritual, it should not be necessary to use it through most of the run. Exceptions include the first Aspect of Depletion room and Kanaxai's Chamber.
- Solo Tank Aggro: At many spots, a single warrior should achieve aggro. During these times, the second warrior should stay back to pick up any strays. Nobody should be within the primary tank's aggro bubble until full aggro is established.
Walkthrough[ | ]
Multiple screenshots are provided to illustrate the various pull points and techniques described in this walkthrough.
Room 1[ | ]
Room 1a: Aspect of Soothing[ | ]


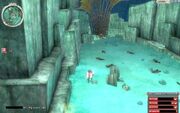
Initial Aggro, Room 1a
This room should include a Warrior, Monk, and the Necromancer. The Monk should place a Healing Seed on the Tank as the Tank runs up to and stands adjacent to the Darkened Irukandji (Jellies). It is important to switch focus between the Jellies and try to interrupt Restoration as much as possible. Running to the Jellies will also aggro the Ripper Carps and the Kanaxai Aspect of Soothing. Laying Spiteful Spirit on the Aspect will help kill the entire mob quickly. The Aspect is usually destroyed after everything else has perished. Alternatively, you can often aggro the Aspect alone using a longbow, kill it, and then kill the rest of the mob. This method is generally easier but slower.
Room 1b: Aspect of Death[ | ]


Spirit Setup, Room 1b
This room should include a Warrior, Monk, and the Ritualist. The Ritualist should summon his spirits near the back right corner. The Monk stays behind the spirits and the Tank is positioned in front of the spirits. When Pain, Bloodsong, and Shadowsong are placed, the Tank can pull the Kanaxai Aspect of Death by itself using a longbow. As the Aspect approaches, the Tank should use Shove to knock it down and halt its progress. By now, the Ritualist should have placed Wanderlust and cast Painful Bond on the Aspect. The Aspect will go down quickly. The rest of the mob is easy to kill after the Aspect is dead. Occasionally, the location of the spawned creatures will not allow you to pull the Aspect by itself. In this case, you should first pull the mob. This way is slower and mildly more dangerous, but it works.
Room 1c: Aspect of Surrender[ | ]
This room is not cleared.
Room 1d: Aspect of Exposure[ | ]
This room is not cleared.
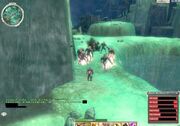
Room 2: Aspect of Pain[ | ]


Initial Pull Point, Room 2
The Warrior, Monk, and Ritualist from Room 1b should wait for a break in the patrols and then run to Room 1a, usually bringing a mob behind them. The Warrior, Monk, and Necromancer from Room 1a should wait at the exit gate of Room 1a. The two Tanks will block the gate, and allow the Necromancer and Ritualist to destroy the mob. Again, interrupting Restoration is important. Once the first mob is destroyed, the remaining patrols of Room 2 can be destroyed in similar fashion.
The Blessed Manta and Kanaxai Aspect of Pain are then destroyed in turn.
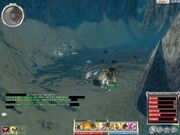
Room 3: Aspect of Lethargy[ | ]


First Pull Point, Room 3
Both Tanks should proceed up the left wall of the entrance to Room 3 and position themselves along the small outcropping. One Warrior should aggro the Leviathan Arms and Leviathan Minds in the left side of the room using a longbow. The Leviathan should be destroyed by the Warriors, spirits, and Necromancer spike damage. Hexes are typically quickly removed so Spiteful Spirit is less useful. The team should then proceed to destroy the nearby Leviathan Heads. Casters should be aware that the Leviathan Heads use Choking Gas.


Second Pull Point, Room 3
The Tanks proceed towards the center of the room and line up between the wall and small jade outcropping near the fire flower. One Tank should disable the fire flower and then aggro one or both remaining groups of Leviathan using a longbow. The casters should stay close to the wall to prevent the Leviathan from moving around the jade outcropping and into the back lines. Of note, the small niche in the left wall in this area would appear to be a safe refuge for the casters, however, the ranged attacks of the Leviathan Minds can pass through this wall (as can the attacks of the spirits).
The team then proceeds to destroy the remaining Leviathan Heads and then the Kanaxai Aspect of Lethargy.
The Gate[ | ]
The team should approach the gate to Room 4 and aggro the nearby Outcasts on the other side using a longbow. They should die easily. The Warriors then both cast Recall on the same Monk. The entire team except that Monk takes positions on the pads in Room 3. When the gate opens, the Monk runs through and counts down from 3 to 1. On 1, Recall is canceled and the Tanks will Shadow Step to the Monk as the gate closes. The rest of the team then comes back to the gate and the Necromancer sacrifices himself to death using Blood Ritual; subsequently being brought into Room 4 using Rebirth. The other Monk and the Ritualist stay behind the gate for now (unless the other Monk brought Recall as an optional skill).
Room 4: Aspect of Depletion[ | ]
After the Necromancer is through the gate, and both the Necromancer and Monk have regenerated a reasonable amount of energy, one Warrior should advance down the right side of the hill and body block the Flesh Golem that is always present. Once aggro is established, the second Warrior should run to the pack of Outcasts behind the Golem and attack them. As the mob dies, Well of Blood should be used to dispose of corpses, preventing the further use of Flesh Golem and Putrid Explosion. This is where Bloodstained armor becomes useful.
When this mob is dead, the casters should retreat to a spot at the top of the hill where there is usually a dead spot in the Aspect of Depletion in order to regenerate energy. Be sure to stay out of aggro range of the gate. One of the Warriors advances to a point just outside of aggro range of the next mobs, which triggers the spawning of multiple Sapping Nightmares and Freezing Nightmares in Room 3. These Nightmares will attack and kill the Monk and Ritualist behind the gate, who are then brought into Room 4 using Rebirth. It is unnecessary to kill the Nightmares.
Again, some time should be allowed to regenerate energy. This next section is the first dangerous part of this run. The priority in this room is to destroy the Kanaxai Aspect of Depletion as soon as possible. This is usually difficult, as he tends to remain deep within the room. However, on occasion he will advance into the center of the room, within range of a longbow. If this occurs, at any time, the tank that triggered the Nightmare spawn should ping his attack, and aggro the Aspect. If the Aspect comes within aggro range, this takes priority over rebirthing the second Monk and the Ritualist.

Pull Point, Room 4
If the Aspect does not come into range, then a lone Tank should aggro the group on the left by walking up to the corner and then advancing into position between the wall on the left, and a small nearby rock outcropping. The second Tank can join the first near the outcropping, or stay back and defend against the possibility of Flesh Golems. It is imperative at this point that the mob on the right and the mob at the far end of the room do not catch aggro. This part is tricky as the Aspect of Depletion will drain significant amounts of energy. The Necromancer has a lot of work to do, casting Spiteful Spirit, exploiting corpses with Well of Blood, and using Blood Ritual on the Monks and Ritualist as needed.
After this first mob is defeated, the Aspect should now be within range of a longbow and it should be pulled back to a safe position and destroyed. The remaining two mobs are straightforward, as long as you do not aggro them both at the same time. Usually, the far mob is destroyed next, and the mob on the right side is destroyed last.
Room 5: Aspect of Failure[ | ]


Initial Pull Point, Room 5
One Warrior should take up position at the left side of the gate. The casters take position behind the gate and to the left. The Ritualist should place spirits a short distance behind the Tank. The other Tank should then enter Room 5 and attempt to aggro all three groups of patrolling Outcasts. This is done by advancing to a square jade outcropping just before you reach the stairs going up. When you have aggro, run back to the gate between Room 4 and Room 5. Endure Pain and Defensive Stance will help keep you alive. Both Monks should be alternating casts of Heal Party. Once back at the gate, the mobs can be easily destroyed. You can tell how many mobs were successfully pulled by the number of Outcast Ritualists present. Often, the Warrior will need to repeat the pull to get the third group.
- The pulling Warrior can cast Recall on the other Warrior as a safety measure, canceling it if they get in trouble on the way back to gate. If this is done, and the Tank gets back safely, Recall should be canceled near the top of the stairs as it will usually otherwise be stripped during the fight.
Once all three patrols are dead, one Warrior should advance back to the jade outcropping to distract the Outcast Raiders. Their arrows cannot hit you at this location. The rest of the team should run along the far edge of the room to the top of the stairs leading down. The Warrior then breaks off and joins the rest of the team. If there is no chest in this room, you may proceed without destroying the Kanaxai Aspect of Failure or the remaining Outcast Raiders.


Pulling Aspect, Room 5
If there is a chest in this room, it can be easily reached. As you approach the top of the stairs down, there is often a dead spot in the Aspect of Failure which allows casting for a brief time. The Necromancer can cast Spiteful Spirit and Reckless Haste to destroy the nearest Outcast Raiders. The Tank climbs the rough jade face to the right of the stairs up (using keyboard movments), aggros the Aspect, and runs down the stairs to rejoin the party, trailing the Aspect behind him. Defensive Stance can protect from archery spike damage. The second Warrior and the Ritualist's spirits should be waiting at the top of the stairs leading down and the Aspect can be destroyed. The remaining Outcasts can be systematically destroyed.
- Any deaths that occur in this room can be raised by the Ritualist using Lively Was Naomei.
Room 6: Aspect of Shadows[ | ]


Initial Pull Point, Room 6
One Tank should take position at the left side of the top of the stairs leading down into Room 6. If the Kanaxai Aspect of Failure is still alive, the casters need to stand in the far left corner in a place where there is a dead spot in the Aspect of Failure. The other Tank will run down the stairs and deactivate the fire flower, spawning two groups of Oni, and then run back up the stairs to take position beside the other Tank. The Oni are easily destroyed using Spiteful Spirit. Do not attack the Oni with melee weapons, bows, wands, staves, or spirits. This will cause them to teleport using Viper's Defense, often into the midst of the casters. It is sometimes advantageous to wand an Oni that breaks into the casters as it will sometimes teleport back in front of the Tank.


Single Tank Aggro Technique, Room 6
A Warrior should proceed along the left side of the room with the rest of the party trailing behind (outside of the warrior's aggro bubble). This is the first place where solo Tank aggro technique will be used. The Tank can use Reborn Irukandji and fire flowers to assist with body blocking. There will be two Oni spawns before you reach the Kanaxai Aspect of Shadows.


Ritualist Solo Killing Aspect, Room 6
Destroying the Aspect is routine.

Final Spawns, Room 6
There will be another two spawns of Oni before you reach the stairs leading to Room 7.
- Try not to get within range of The Leviathan.
Room 7: Scorpion Aspect[ | ]


Initial Pull Point, Room 7
The Warriors should take position at the left side of the top of the stairs. The casters should be safely around the corner, behind the wall. The Ritualist can place spirits behind the wall to the left. These spirits should not be able to hit the Reborn Irukandji due to being obstructed. They will also not be able to hit any Oni held by the Tanks, but will quickly eliminate any Oni that get around the corner. A Warrior will need to watch the room below and advance down the stairs as patrols of Oni come near. Aggro as many patrols of Oni as possible using a longbow and walk back to position at the top of the stairs. The Oni will quickly fall to Spiteful Spirit. Repeat this action until you see the gate to Room 8 is open. If there is a long break between Oni patrols, you may advance down the stairs to destroy the Outcasts at the base of the stairs. If you do this, the Warriors should continue watching for Oni patrols, with the team returning to the top of the stairs if more patrols come near.


Safe Niche, Room 7
Once all the Oni patrols and the Outcasts at the bottom of the stairs are destroyed, the team may run to the right and then up the next set of stairs, avoiding catching aggro on the Outcast patrols. There is a small niche to the left of the stairs where the team can safely wait (without fear of aggro or teleportation) for the patrol at the base of the stairs to leave. One person should turn off the fire flower at the top of the stairs. When the patrol returns to the bottom of the stairs, it should be destroyed.
The next part can be tricky for 6 man teams due to the unpredictability of the Scorpion Aspect teleports. The team should advance along the right wall until it reaches a small wall of jade with a nearby Outcast patrol. The Warriors will attack the Outcasts while the casters run around the small jade wall. Usually, a second Outcast patrol will eventually join the fight. Destroy both patrols, and then proceed to destroy the nearby Kanaxai Aspect of Scorpion.
Room 8: Aspect of Fear[ | ]


The Corner, Room 8
Proceed down the stairs and make a tight group in one of the corners at the base of the stairs. The Warriors should stand a very short distance away from the cluster of casters to maximize their ability to body block the Oni. Six groups of Oni and Nightmares will spawn in sequence and descend the stairs to attack. The Freezing Nightmares will Shadow Step into the caster group, but are fairly harmless and easily destroyed. It is important to body block the Oni to prevent the use of Temple Strike on the Necromancer. The Necromancer can quickly kill the groups using Spiteful Spirit and Well of Blood is useful to assist in healing. The Ritualist may or may not cast spirits during these battles as per preference of the party.


First Bridge Pull, Room 8
Solo Tank aggro technique should be used to aggro the next Oni spawn at the right corner of the end of the first bridge. Destroy the Oni. Dual Tank walls should be used at the ends of the next two bridges. The Ritualist should again cast spirits out of range of the main aggro, but within range to destroy any Oni that break through.


Final Bridge Pull, Room 8
The Kanaxai Aspect of Fear can be pulled along with several groups of Oni at the end of the third bridge. The fast attack rate of the Aspect will help destroy the Oni using Spiteful Spirit.
Room 9: Aspect of Depletion[ | ]


Pulling Nightmares, Room 9
This is the next tricky part of the run. The entrance to Room 9, at its narrowest point, is still very wide. One Tank should set up slightly to the right of the middle of the narrowest point of the mouth to Room 9. The other Tank should position themselves halfway between the first tank and the right wall. The casters need to stay within the right half of the room, and should initially be very deep (well outside of the Warrior's aggro bubbles). The Ritualist should set up spirits (spaced wide enough so that only one can be affected by Chaos Storm), so that they are not within range of the main aggro, but within range of anything breaking behind the Tanks.
The left Tank will then advance slightly forward to spawn the Nightmares in Room 9, and then step back into place. The Nightmares will start patrolling in a counter-clockwise direction around the room. After they move to the right of the mouth of the cavern, the left Tank should aggro them using a longbow (the Tank should remain stationary as he does this). The Nightmares will advance towards the Warrior wall and, coming from the right side, should get stuck on the Tanks and ignore the large gap on the left. The left Tank can pull additional groups from his stationary position as necessary using the longbow. Any Nightmares that do go through the Warriors should be quickly destroyed by the spirits. The casters need to move in and out of casting range as necessary to try to avoid being targeted with Chaos Storm.
- Updated aggro rules implemented after the release of Nightfall cause this technique to be mildly less effective than previously. Mobs approaching the Warrior wall will now spread out along the wall and usually one Nightmare will end up positioned on the left side of the left Tank (near the large gap). As the casters advance into aggro range, this Nightmare usually breaks off the Tank and heads into the back line. One or two at a time are usually no threat and are finished off quickly by the Ritualist's spirits.
After all the Nightmares are destroyed, the party can progress along the right side of the chamber to Room 10. The Kanaxai Aspect of Depletion does not need to be killed unless there is a nearby chest.
Room 10: Aspect of Decay[ | ]
A single Tank should enter Room 10 and proceed to turn off the closest flowers directly in front of the entrance to the room. In doing so, the Tank will spawn two groups of Oni. These Oni should be gathered up and brought back to a point in the middle of the entrance of Room 10. The Oni can then be destroyed.
It is usually easier and faster to clear the right side of the room, unless a chest is seen on the left. Both Warriors should cast Recall on a caster and proceed up opposite walls, turning off flowers as they go. When they reach the end of the flowers, cancel Recall to lose aggro and return to the casters. The Monks should heal using Heal Party and not chase after the Tanks for direct healing. The Outcast and Oni groups can then be destroyed using single Tank aggro technique. Additional groups of Oni will spawn near both exits to Room 10, as well as near the Kanaxai Aspect of Decay. The Aspect does not need to be destroyed unless there is a nearby chest.
Room 11: Aspect of Torment[ | ]


Single Tank Aggro, Room 11. Note "Leapfrog" Technique.
If you went to the right in Room 10, several small groups of Oni will spawn. If you went to the left, you will spawn several small groups of Sapping Nightmares and Freezing Nightmares. All groups can be easily destroyed using Single Tank aggro technique.
Destroy the Kanaxai Aspect of Torment and the adjacent Outcasts in routine fashion.
Room 12: Kanaxai's Chamber[ | ]
Both Warriors should cast Recall on the Necromancer. The Necromancer, Monk, and Ritualist should all advance a small distance into the room. The Monk will be casting Heal Party as often as possible. The Necromancer should keep Blood Ritual on the Monk. The Ritualist should cast spirits to provide the Necromancer with an energy battery.


Position of Nightmares, Room 12
Both Warriors and the other Monk should proceed along the left wall of the Chamber. Kanaxai should be pulled up the left wall to a spot just in front of the midline of the Chamber. Using Defensive Stance and Dolyak Signet as necessary to prevent being knocked down, the Warriors will use Shove in sequence to knock Kanaxai down twice. The second knockdown must occur after Kanaxai has stood back up in order to take effect. Upon the first knockdown, the Monk should retreat to the entrance of the room. If something goes wrong, it is quite possible (using Dolyak Signet, Endure Pain, and Defensive Stance with Heal Party) for a Tank to survive until Shove recharges in order to achieve the second knockdown. With each knockdown, a group of Sapping Nightmares will spawn. Once both knockdowns have been achieved, the Warriors will cancel Recall. The Nightmares generally remain near the knockdown point, and Kanaxai will reset to his default location. The Nightmares should not be attacked or destroyed.

Kanaxai Pull, Room 12
The party then proceeds to the right side of the Chamber and pulls Kanaxai up to the midpoint of the right wall. Both Warriors should block his retreat by establishing position below him. There is no need to block the side facing the casters, as long as they do not get too close.
The primary damage to Kanaxai will come via the Ritualist's spirits with the Warriors causing secondary damage. The Necromancer should concentrate on maintaining Spinal Shivers on Kanaxai and casting Blood Ritual on the Monks (and Ritualist, as needed). Spiteful Spirit and Reckless Haste generally should not be used as the Necromancer's energy is limited and should be dedicated for Shivers and Blood Ritual. The deaths of the Ritualist's spirits provides battery for the Necromancer via Soul Reaping. The Warriors can help interrupt Nightmare Refuge using Distracting Blow. Both Distracting Blow and Nightmare Refuge have a recharge time of 10 seconds, making it easy to establish the correct timing.
- Two warriors attacking with Icy weapons should be sufficient to interrupt every casting of Nightmare Refuge. Monks and Ritualists with Icy Spears may assist with triggering Spinal Shivers when not casting (though this is infrequent). If a Nightmare Refuge slips through, it is often removed by Disenchantment.
- If the knockdown point was not in an optimal position, one of the Warriors can do a sweep by casting Recall on one of the casters, running through the Sapping Nightmares, and leading them to the opposite corner of the room before canceling Recall.
Notes[ | ]


Coveted Kanaxai Triple Drop
- As Kanaxai always drops a Kanaxai's Edge, Kanaxai's Axe, and Kanaxai's Mallet, there is a much better chance of getting a Green drop in a 6 man team. For each person,
- the chance of getting 1 Green is 75/216 = 34.7%
- the chance of getting 2 Greens is 15/216 = 6.94%
- the chance of getting 3 Greens is 1/216 = 0.46%
- the overall chance of getting at least 1 Green is 91/216 = 42.1%
- the overall chance of getting no Greens is 125/216 = 57.9%
- the overall chance of getting at least 1 Green in a 12 man group is 397/1728 = 23.0%
- the overall chance of getting no Greens in a 12 man group is 1331/1728 = 77.0%
- In a coordinated group, this run can be performed in 75 minutes (including stops for out-of-the-way Chests)
- The 6 man Deep team was first discussed on a fan forum on 9/13/2006. [1]