| Cathedral of Flames | ||||||||||||||||
|---|---|---|---|---|---|---|---|---|---|---|---|---|---|---|---|---|

| ||||||||||||||||
| Dungeon | ||||||||||||||||
| ||||||||||||||||
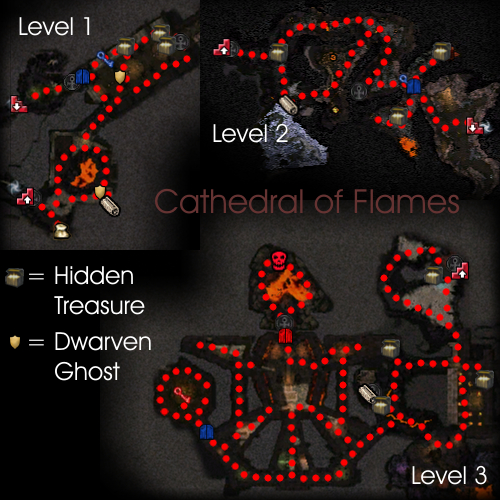
| Map | ||||||||||||||||
|
Description[ | ]
Once freed, Pyre's warband sacked the cathedral, looking for anything of value. In their search, they unearthed a blocked passage. Clearing the debris revealed a stash of treasure, plundered from the Ascalonian ruins...but there was more. The spirits of those slain for these spoils of war had attached themselves to the treasure haunting the vaults. Worse yet, a powerful Necromancer named Murakai dwelt among them. She used the creatures' unliving essence to create a storm of souls which she planned to unleash upon human and Charr alike. It fell to us to lay these disembodied spirits to rest and suspend Murakai's wrath. If only for a time.
The Cathedral of Flames is a 3 level Dungeon; the final boss is Murakai, Lady of the Night. Once she is killed, Murakai's Chest will spawn and the dungeon is completed.
Getting there[ | ]
Accessed via taking the quest Temple Of The Damned from Gron Fierceclaw, the merchant in Doomlore Shrine. Talk to him again to enter the dungeon.
Quests[ | ]
- Temple Of The Damned

- You also have to enter this dungeon in the quest Warband of Brothers. The layout is changed a bit and the monsters differ.
NPCs[ | ]
Allies[ | ]
Collectors[ | ]
- 20 Dextarr Dirtdigger
- 20 Akom
- 20 Lars Bridgeater
Bestiary[ | ]
Monsters[ | ]
- Charr
- 20 (26) Charr Axemaster
- 20 (26) Charr Blademaster
- 20 (26) Charr Bladestorm
- 20 (26) Charr Seeker
- 20 (26) Charr Sentry
- 20 (26) Charr Prophet
- 20 (26) Charr Mender
- 20 (26) Charr Hexreaper
- 20 (26) Charr Dominator
- 20 (26) Charr Flameshielder
- Ghosts
- 15 Restless Spirit
- 24 Restless Spirit
- Undead
- 20 (26) Crypt Ghoul
- 20 (26) Plague Zombie
- 21 (26) Crypt Banshee
- 22 (26) Crypt Wraith
- 17, 22 (26) Shock Phantom
- 23, 22 (26) Ash Phantom
- 20 (26) Crypt Slasher
Bosses[ | ]
- Level 1
- 24 (30) Faze Magekiller (Power Block)
- 28 (30) The Keeper (Life Transfer)
- Level 2
- 24 (30) Tyndir Flamecaller (Ether Prodigy)
- 24 (30) Vraxx the Condemned (Soldier's Fury)
- 28 (30) The Master (Jagged Bones)
- Level 3
- 24 (30) Murakai's Steward (Corrupt Enchantment)
Boss-like foes[ | ]
- Level 3
- 24 (30) Keymaster of Murakai
- 29 (32) Murakai, Lady of the Night
Walkthrough[ | ]
Level 1[ | ]
This level is fairly small and straightforward. Head to the Area Map in the northeast near a group of allied Charr who will predictably turn hostile when you reach them. Shortly afterward, you will find Faze Magekiller who drops the dungeon key upon death. By the dungeon exit, there will be a group of Ghosts. Kill all of them to continue to the next level.
Level 2[ | ]
When you reach a fork in the path you can go south and get the Area Map along a slightly longer route, or go north into a shorter route, but not noticeably easier. Needling Lavastriders will usually pop-up near any pools of lava. Eventually, both paths end up in a room with Poison Dart traps. Flagging heroes and slow measured progress are keys to survival here. At the Dungeon Lock, you will fight an uphill battle with a group of Charr and the Elementalist boss Tyndir Flamecaller who drops the dungeon lock when he dies. After that, there will be a large room with Undead that are easily pulled. Just before the passage to level 3 is another boss, The Master, along with a group of minions and ghosts.
Level 3[ | ]
As soon as you enter, the Keymaster of Murakai will be in front of you and will begin to run to the south. It drops the Dungeon Lock when it dies. Head south and turn to the west. The room with flaming trees contains many groups of Enchanted Weapons and leads along a longer route, however there may be a Hidden Treasure inside it. Head southwest whenever possible to avoid the middle corridor that is laden with Flame Dart traps. The room after the Dungeon Lock contains Murakai's Steward, who drops the Boss Key. There are many Undead which pop-up when you come near them, so it is recommended to clear the room out of hidden pop-ups before engaging Murakai's Steward. Head north along the nearby passage to get as close to the Boss Lock as possible without being in range of the Fire Dart traps. Time your run through the Fire Trap corridor so that your group will not be caught off-guard by the Flame Jets along the stairs leading to the Boss Lock. In Murakai's room, there are several groups of Plague Zombies and Bone Fiends, all of which can easily be killed before fighting Murakai. When battling Murakai, her power meter will fill up whenever she uses Murakai's Consumption. The higher it fills, the more devastating skills she can use, most of which cause your party to become filled with conditions. Interrupts and continued pressure are keys to winning this battle.
Tips[ | ]
- Wards are recommended, especially Ward Against Melee as the Enchanted weapon mobs apply a lot of melee pressure.
- The Charr and the Undead creatures will fight each other so it might be a good idea to just stand back and watch the brawl.
- Beware of fighting while in the range of the flame darts along the corridor leading to the final boss room - they can take out your entire party. Pull the mobs patrolling along the corridor to the side and fight them there.
- It is also possible with the use of a tank to keep aggro away from the team.
- Use of holy damage is recommended (due to the heavy undead presence). A very popular Holy damage skill is Light of Deldrimor, as it has no attribute and reveals hidden items, which are very common in the dungeon.
- Oddly, the Restless Spirits accompanying The Keeper at the end of level 1 do not seem to be undead, and do not take double holy damage. The Keeper himself, however, does.
- Due to the large number of Charr, use Ebon Vanguard Skills, such as Ebon Vanguard Assassin Support, and Rebel Yell Title, if possible.
- In hard mode there are several pop-up groups that don't appear in normal mode. These are usually near other mobs, and if not expected, can easily cause a wipe.
Light of Deldrimor rewards[ | ]
Level 1
- 24 Dwarven Ghost ally, near the area map on Level 1.
- 24 Dwarven Ghost ally, between the 1st and 2nd table in the mess hall on Level 1.
- Hidden Treasure near the second ghostly ally, closer to the nearer wall
- Hidden Treasure near the beacon and the Charr at the far end of the Great Hall.
- Hidden Treasure behind Faze Magekiller.
- Hidden Treasure after passing through the dungeon lock on the first level, one just a bit west of the res shrine after going through the door, one back in the back of the adjacent cul-de-sac, and another next to The Keeper
Level 2
- Use Light of Deldrimor after running a bit east on the second level. There should be one towards the northern path that takes you into a Charr patrol. Use it again, there is normally another one down each path you can take. (not always there, may be determined by when you use Light of Deldrimor)
- Hidden Treasure to the east of the entrance on Level 2, along the slanted north wall near a group of patrolling Charr
- There is a hidden treasure down the southern path on Level 2, it has a poison jet spraying right on top of it.
- 2 Hidden Treasures lie to the northeast of Tyndir Flamecaller's group in a pool of lava. Approaching it will spawn a small group of Needling Lavastriders. (Try to use Light of Deldrimor when you can see the pool on your compass, but before you are close enough for Tyndir to start talking)
- Hidden Treasure to the southeast of the middle shrine, in a pool of lava. Approaching it will spawn a small group of Needling Lavastriders.
Level 3
- Hidden Treasure next to entrance.
- Hidden Treasure straight south of entrance, in southwest corner of the burning garden.
- A hidden treasure is sometimes in the middle of the burning garden
- Use Light of Deldrimor when you get the hidden treasure in the southwest corner of the burning garden, it normally pings a chest that is due south of it
- Another 2 hidden treasures are often by the area map (can even be 3, one can be 'hidden' by the side of the platform)
- Sometimes the hidden treasures are bugged; on the second level you may pick up more than 1 at a time on your compass, but when you try to use it in the specified area, it will ping a different location on your mini map (second level for example, hidden treasure on poison jet not showing up on mini map at first)
- A hidden treasure is northeast of the Area Map, take the bridge over the lava, go left and it is in front of a large stone wall
Rewards[ | ]
- When opened, Murakai's Chest spawns an Exquisite Surmia Carving and 1 item for each player (2 items in Hard Mode)
- Items rewards may be:
- A Unique item exclusive to this chest:
- A gold item
- Weapons exclusive to this reward chest:
- Rare crafting materials
- A Ruby Djinn Polymock Piece
- 1500 Ebon Vanguard reputation points (2250 in Hard Mode) for a first time completion, and half the points for repeats.
Notes[ | ]
Trivia[ | ]
- The Lava pool inside Murakai's room is heart-shaped.
- On the third level of this dungeon, in the graveyard at the Boss Key, it is possible to see murals of all 5 True Gods. Simply look up, the murals are spaced on the ceiling all around the room.