Mission Objectives and Rewards[ | ]
- Must have Bonus Mission Pack.
- Must have Gwen's Story.
- Must have no weapons equipped.
Obtained from
- Durmand in Lion's Arch, Kamadan or Kaineng Center. Once you have the book, open it and turn the page, then click 'Enter Mission'
Objectives
- Escape from the Charr prison camp.
- ADDED Find a way to defeat the siege devourer.
- ADDED Navigate the underground ruins and find an exit.
- ADDED Reach the foothills of the distant mountain. Be wary of Charr patrols.
Rewards
- 500 Gold
- 2500 Gold for each discovery completed.
- After the mission has been completed, you can take Gwen's Story back to Durmand to have it authorized. You can then trade it to Tuomas (located next to Durmand in each port city) in exchange for a customized Charr Weapon. Each related mission offer different sets of weapons. Once a book has been authorized, it can't be placed in your Xunlai storage.
Dialogue
- Durmand: "Relive the story of Gwen's escape from the Charr, and see how she came to meet Captain Langmar and the Ebon Vanguard."
Walkthrough[ | ]
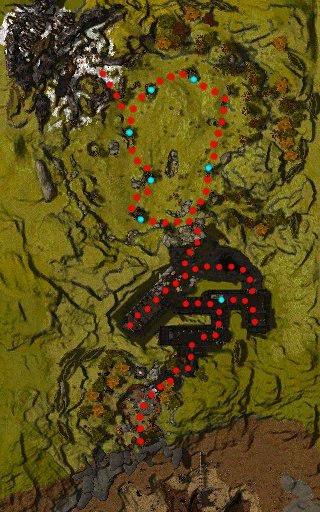
Walkthrough map with key hiding spots marked
During this mission, you will be under the effects of the Gwen disguise, which sets your stats to 300 Health, 20 Energy, and 4 Energy regeneration, and gives you the following skill bar:
 |
 |
 |
 |
 |
 |
 |
 |
The last four slots will be empty initially. Gwen will learn a new skill at each Research Journal you find during the quest. Illusion of Haste is identical to the standard version with 12 Illusion Magic, while the other three are custom versions for this quest.
First of all, you will need to fight a Devourer Catapult. During this, hide behind various structures to avoid the Devourer's siege attack. You can take at most two consecutive hits from the Devourer, and still survive without needing to regenerate health. Grab Rocks and use Throw Rock on the cracked pillar. Wherever the Devourer's siege attack hits, another rock will appear, which you can quickly grab and throw at the pillar. It will take 5 hits to go down, and will then crash on the Devourer and kill it.
After the short cutscene, head through the now open doors and travel into the caverns. Use the gate lock to keep the Charr out (though you don't have to, they stop outside it anyway).
Use the first Research Journal you find to learn Illusion of Haste. Continue ahead and then to the right, where you will find another Journal. It will teach you Shared Burden. Wait a few seconds next to it, and a group of human ghosts and Nightmare Charr will appear. Immediately use Shared Burden on the Charr, and follow the ghosts. Once the skill is recharged, use it on the Charr a second time. Two uses should be enough to complete this goal.
Soon, the ghosts will reach a closed door, which they will now open (if you slowed the Charr successfully). Learn Distortion from the Research Journal near the door. Pick up a rock at your feet and go down the corridor ahead. Use Distortion on your way through the corridor to defend against the fire darts. At the end of the corridor, throw the rock at the cracked pillar, which will crash on the Charr and kill them. Learn Sum of All Fears from the Journal nearby.
Now, head back to the entrance to the corridor and head right, past the unlit Flame Brazier and through the spike traps (this is the faster way). Use Flee and Illusion of Haste to relieve yourself from Cripple as often as you can. Grab the Unlit Torch on the ground, light it from the Brazier next to it, and head back to light the other Brazier before the flame goes out. You are now free to leave the caves. Head Northeast up the wide stairs and into the valley.
Once outside, you will need to use your skills well to get past the Charr patrols. Head Northwest towards the mountains using Flee to avoid the patrols. The Charr move faster than you, so you may want to save Flee until the Charr get close to you. Keep an eye out for ruined buildings in the area. When you walk into one of them, your Hide skill becomes available, and the Charr will ignore you, even if you were already under attack. This could be a good way to regenerate and lose aggro. You can use your two slowing skills, Shared Burden and Sum of All Fears, to slow the Charr and run away using Flee or Illusion of Haste (the latter is very useful if the Charr cripple you). If you happen to take a lot of damage and are still under fire, with no hiding spots nearby, use Feign Death and do not move until the Charr have moved away. Use this skill only when in dire need, due to its particularly long recharge time. Get to the snowy foothills to complete the mission. You will see a cutscene with Captain Langmar and her squad.
Note - When you use Feign Death, the Charr will ignore you, but if you have aggroed any wolves, they will keep attacking you, since you apparently can't fool them.
Discoveries[ | ]
After completing the mission once, you can repeat it by opening Gwen's Story again. Now you can find the Discoveries, which are three bonus objectives that will reward you with 2500 Gold each.
1. You found the key hiding places Gwen could have used to elude the Charr.
- Find all 7 hiding places from the Charr. You will know if you are in a hiding spot, because the skill Hide will become active. One is located in the cave by the first Flame Brazier you come across, the other six are in the ruined buildings outside the cave before the Charr Foothills. You can find a raven flying near the spots.
2. You determined how Gwen would have freed the Ascalonian spirits from their long nightmare.
- You need to do this to exit the ruins anyway, so just follow the above walkthrough for this one.
3. You showed how quickly Gwen might have made her escape.
- Complete the mission in under 10 minutes.
Creatures[ | ]
NPCs[ | ]
 1 Ascalonian Peasant
- 1 Ascalonian Farmer
- 1 Duke Gaban
- 15 Lilla
- 24 Cendin
- 24 Scarlot
- 24 Asgand
- 20 Anton
- 20 Jenn Valefield
- 20 Captain Langmar
- 20 Captain Weststar
- 20 Brave Brent Poltroon
Monsters[ | ]
- Charr
- /20 Charr Prison Guard
- 8 Nightmare Charr
- 15 Charr Scout
- 15 Charr Tracker
- Others
Bosses[ | ]
Animals[ | ]
- 5 Black Wolf
- 5 Raven
Dialogues[ | ]
- Duke Gaban: "Finally awake, girl? Trust me, the nightmare of this world is far worse than any you could dream up in your fitful sleep. Today, the Charr plan to feed us to a siege devourer simply for their amusement."
- Duke Gaban: "But those vile beasts don't realize the extent of my vast knowledge of these lands; at one point, they were part of my estates. I know of a series of tunnels that leads into some old ruins nearby. Beyond that lies freedom. I need only find a way past that infernal creature to once again breathe air as a free man!"
- Dahgar, the Eye of Flame: "You there! Pretty boy. Come! Show us if you fight even half as well as you dress."
- Duke Gaban: "Look at that leaning pillar. I think I can knock it over with a rock. My freedom is at hand. If you can escape in the confusion, do so. Farewell!"
- Dahgar, the Eye of Flame: "What? Over already? Worthless! Such a pity for a man to die as uselessly as he lived. At least he could have entertained us."
- Dahgar, the Eye of Flame: "Perhaps you will provide better sport, little mouse. You always did like to scurry so. Tell me, though, where shall you go now that there's nowhere left to run? No need to answer with words. Your tears will suffice."
- Gwen: "I can't fight that thing. I have to hide."
- Gwen: "That pillar is cracked. I wonder..."
- Dahgar, the Eye of Flame: "Impossible! Kill her before she escapes!"
- Gwen: "Must... close... the gate!"
- Dahgar, the Eye of Flame: "She fled into the ruins...foolish mouse. None who enter that place ever return. Post guards at the exits in case she attempts to be the first."
- Asgand: "We must not fall! Only we know what the Charr have planned. If we don't stop them..."
- Cendin: "I will fight until the last! The Charr cannot sear our lands if my flame burns them first!"
- Scarlot: "Velise may no longer be with us, but no matter how many Charr we face, remember we are not outnumbered. All of Ascalon stands with us this day. We shall not fail. We fight for the lives of our countrymen. We fight for their future!"
Notes[ | ]
- After completing a discovery on your account it stays completed and cannot be redone for an additional reward by any other character on your account.
- After the completion of a discovery, Durmand [Historian] offers, as an additional reward, an authorized copy of the story which you just completed.
- You may still take damage after using the skill Feign Death. This is most likely due to the flight time of arrows and could result in death if your health is very low.